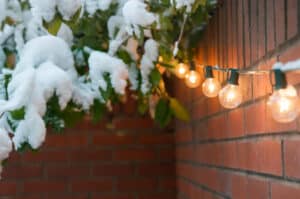
Decorating a brick home with lights and festive decking can add a delightful touch of festive cheer. However, it can also present challenges in terms of safety and property maintenance. Bricks are sturdy and uneven, making them difficult to penetrate with nails or staples. Carelessly hanging lights might damage the bricks, pose safety hazards, or reduce the lifespan of the lights. By investing time and choosing the right methods, you can ensure your home looks festive while maintaining safety. In this article, we will guide you through four effective methods to hang Christmas lights on brick, both safely and with ease.
How to Hang Christmas Lights on Exterior and Interior Brick
Decorating with lights during the holidays is a cherished tradition that brightens our surroundings and spirits. However, hanging lights on brick surfaces presents its own set of challenges. In this guide, you’ll discover safe methods for affixing Christmas lights to both exterior and interior brick walls. It’s essential to prioritize safety: always wear gloves and ensure you have the necessary tools on hand. Depending on your chosen method, these may include ladders, brick clips, hot glue guns, adhesive hooks, drills, and zip ties.
Glue Gun Method for Brick Surfaces
The glue gun method offers a straightforward and efficient approach to hanging Christmas lights on brick surfaces. This technique employs a hot glue gun, giving a temporary hold without leaving any residue behind. For this method, select a standard hot glue gun that has a comfortable grip and pair it with clear glue sticks. Ensure you preheat the glue gun for a minimum of two minutes before its application. To safeguard your hands from potential burns, always wear thick gloves.
Application Process for Best Adherence
To ensure optimal adherence, apply a thin, consistent layer of hot glue to the plastic base of the first light. This promotes better bonding with the brick. Be careful not to get glue on the bulb or the electrical wire enclosed within the plastic, as this will ensure the light’s longevity. Choose the orientation of the light based on your desired decorative style. For lights that are perpendicular to the wall, apply glue to the base’s bottom. For lights that will lay flat against the brick, ensure the base is glued flush against the brick.
Securing and Checking the Lights
When securing and checking the lights, press each light firmly onto the brick and hold for a minimum of 20 seconds, ensuring the glue sets properly. After attaching, inspect each light to assess its security. If a light appears firmly in place, proceed to the next one. If not, gently remove it, apply additional glue, and reattach. When affixing each light socket, allow a bit of slack in the cord between them. This prevents any tension that might pull the lights off the wall.
Finalizing Your Festive Decorations
As you’re finalizing your festive decorations, make certain that the lights are securely fastened and either hang in a straight line or follow your chosen decorative pattern for the best visual appeal. After the festive season, when detaching the lights, you can clean any residual glue using a cloth moistened with rubbing alcohol. For storage, coil the lights carefully and keep them in a cool, dry location, ready for the next holiday season.
Considering Alternatives
While the glue gun method is efficient and leaves minimal residue, there can be occasional adhesive failures, especially in colder weather. If you’re looking for alternatives, consider adhesive clips or brick clips. Both offer reliable ways to hang lights without the need for glue.
Using the glue gun to hang Christmas lights on brick is straightforward and offers an aesthetically pleasing way to adorn brick surfaces with festive lights. It provides a temporary, neat solution, ensuring your home radiates festive cheer
Outdoor Mounting Tape Method
Outdoor mounting tape is a versatile adhesive designed for a range of surfaces, including brick. It comes in both permanent and temporary varieties. While the permanent tape ensures strong bonding, the temporary version is better suited for seasonal decorations, such as Christmas lights.
Pros & Cons of Using Outdoor Mounting Tape
Outdoor mounting tape boasts several benefits, including its versatility, long-lasting nature, and resilience in varying weather conditions. On the downside, it can be challenging to remove and might pose a risk to the exterior paint of your home.
Step-by-Step Guide to Mounting Christmas Lights with Outdoor Tape
To hang Christmas lights on brick using outdoor mounting tape, follow these steps:
Prepare the Surface
Ensure the brick is clean and free from dust.
Apply the Tape
Measure and cut the appropriate length of tape, then press it firmly onto the brick.
Test the Setup
After attaching the lights, give them a gentle tug to confirm they are securely in place.
Post-Season Removal
Once the holiday season is over, remove the lights gently. If there’s any residual adhesive, you can clean it off with solutions like rubbing alcohol.
Expert Tips: To make the most of the outdoor mounting tape method, choose the right tape based on your specific needs and store the tape in a cool, dry place after removal.
Effective Brick Clips Method
The brick clips method offers a safe and efficient way to hang Christmas lights on brick walls without causing damage to the brickwork. These metal brackets are specifically designed to latch onto bricks, ensuring decorations, particularly lights, can be hung securely without the need for drilling. Choosing the correct clip size—standard, queen, or max-size—is crucial for the best grip.
Preparation and Planning for Installation
Before setting up the installation, measure the display area to determine the number of clips required and their placement. Ensuring proper spacing will evenly distribute the weight, which reduces the risk of the clips and decorations becoming dislodged.
The Installation Process
Begin the installation by properly attaching the clip, then press and hold for a few seconds to ensure it grips securely. When stringing the lights, ensure there’s no excessive pulling or tension. This step minimizes the risk of the lights becoming detached or the clips getting dislodged.
Dismantling After the Festive Season
Dismantling the decorations after the festive season should be as easy as putting them up. First, unplug the lights. Then, carefully remove them from each clip, making sure not to tug or pull too forcefully. To remove the clips, gently wiggle them and ease them away from the brick, ensuring no damage occurs to either the clip or the wall.
Anchor Plugs Method
The anchor plugs method provides a straightforward and reliable means of hanging Christmas lights on brick. These small plastic tubes are designed to fit snugly into holes drilled into a brick wall’s mortar, offering a firm base for screws. Notable for their durability and dependability, anchor plugs represent a one-time investment that delivers a sturdy solution year after year.
How to Install Anchor Plugs
To install anchor plugs for hanging Christmas lights, start by measuring and marking the desired location for your lights. Before drilling, always wear safety goggles and gloves to protect against brick dust and accidents. Choose anchor plugs that match the size of the holes you intend to drill, and use a masonry drill bit to make the holes. Once drilled, insert the anchor plugs, ensuring they fit snugly without any wobble. If there’s excess material around the holes, use a chisel to gently remove it for a better fit. Next, screw in the cup hooks that will hold the lights. Finally, beginning from one end, ensure the lights are untangled and hang them on the hooks.
Additional Tips for Aesthetic and Safe Installation
Before installing, inspect your lights to ensure they’re functional, and replace any non-working bulbs. Opt for LED Christmas lights for energy efficiency and cost benefits. Prioritize cord safety by examining all cords for damage and replacing any that are worn out. When setting up an external display, use lights specifically designed for outdoor use due to their weather resistance, and make sure they’ve been safety-tested to minimize electrical risks. Keep extension cords hidden and away from pathways to prevent tripping, and ensure that outdoor electrical outlets are GFCI-rated to avoid shocks. For energy conservation and safety, turn off the lights when they’re not needed or when you’re away from home.
Should I Consider DIY or Hire a Pro?
Christmas lights infuse homes with joy and holiday spirit, but choosing between DIY and hiring a professional can be daunting. While DIY projects bring personal satisfaction and potential cost savings, they might not always be the most cost-effective option due to risks like falls, electric shocks, or injuries. To mitigate these risks, it’s vital to use appropriate tools, wear protective gloves, and ensure a stable working surface. In weighing DIY against hiring a professional, one should account for equipment costs, decoration expenses, potential medical or repair bills, and the assurance that comes with professional guarantees. Engaging a professional brings peace of mind, ensures decorations are resilient to winter conditions, and employs proper anchoring techniques to avert damage.
Elevate Your Home’s Exterior for the Festive Season
As the holiday season approaches, many homeowners are looking for ways to enhance the visual appeal of their homes, both inside and out. One effective way to make a striking impact is by learning how to hang Christmas lights on brick. When done correctly, this can provide a captivating festive touch that complements your overall home decor.
Get your home ready for the festive season with North Texas Home Exteriors. Our team of specialists in exterior remodeling North Texas leads the field and takes pride in creating transformations that make residences gleam, especially during the festive season. Whether you want a complete makeover or simply wish to add festive touches, our dedicated team combines professionalism with artistic flair to bring your dream aesthetic to life. Choose North Texas Home Exteriors and make your home the holiday centerpiece of the neighborhood!
Illuminate your brick facade safely! Explore 4 easy methods to hang Christmas lights securely. Enjoy a festive and worry-free holiday display.