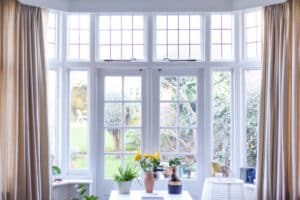
Are you wondering how to install a French window to add a touch of elegance to your home? French windows are beautiful and blend indoor and outdoor spaces seamlessly, filling your home with natural light and creating an inviting atmosphere.
Imagine opening those stunning double-paned doors, stepping onto your patio, and feeling the seamless connection between your indoor and outdoor areas. French windows offer this unique blend of openness and connection with nature, making them a dream addition to any home.
If you are ready to transform your space, follow our comprehensive guide on how to install a French window in five easy steps. With the right tools and some DIY enthusiasm, you’ll be enjoying the timeless beauty and functionality of French windows in no time.
Benefits of Installing French Windows
Installing French windows in your home offers several practical and aesthetic advantages. This is why this upgrade could be a great choice for you:
Increased Natural Light
French windows have large glass panes that let in plenty of natural light, brightening up your rooms and creating a warm, inviting atmosphere.
Seamless Indoor-Outdoor Flow
These windows make it easy to connect indoor and outdoor spaces, perfect for homes with patios, decks, or gardens. You can open them wide to enjoy a smooth transition between your living areas and the outdoors.
Enhanced Ventilation
The design of French windows allows for excellent cross-ventilation, providing a steady flow of fresh air throughout your home. This natural airflow can help create a healthier indoor environment and reduce the need for air conditioning.
Aesthetic Appeal
French windows bring a stylish charm to any home. Whether you prefer a traditional or modern look, these windows enhance the overall appearance and charm of your living space.
Increased Property Value
Investing in French windows can boost the resale value of your home. Potential buyers often appreciate the luxurious look and functionality of these windows, making your property more attractive on the market.
Tools and Materials Needed for Installation
Before embarking on your French window installation project, it’s essential to have the necessary tools and materials at hand. Check out this complete list to help you install your windows correctly:
Tools
- Tape measure
- Level
- Hammer
- Pry bar
- Utility knife
- Caulking gun
- Drill and drill bits
- Screwdrivers (flat and Phillips head)
- Putty knife
- Saw (for trimming, if necessary)
- Safety gear (gloves, goggles, and dust mask)
Materials
- French window unit (pre-hung or custom-sized)
- Shims
- Flashing tape
- Caulk (interior and exterior grade)
- Insulation (foam or fiberglass)
- Screws or Nails (as recommended by the manufacturer)
- Weatherstripping
- Trim pieces (if needed)
It’s advisable to have all the necessary tools and materials gathered before starting the installation process. This will ensure a smooth workflow and prevent any delays or interruptions.
Step 1: Measuring and Preparing the Opening
Accurate measurements are crucial for a successful French window installation. Follow these guidelines to get the right fit:
- Measure the height and width of the existing window opening at multiple points. Use the smallest measurements to account for any irregularities in the opening.
- Compare the measurements with the dimensions of the new French window unit. It’s important to have at least 1/4 inch of additional space around the perimeter to allow for proper shimming and installation.
- If the existing opening needs to be enlarged, consult a professional contractor or follow the manufacturer’s instructions carefully. Modifying the structural elements of your home can be complex and may require additional permits or inspections.
- Once the opening is prepared, clean the area thoroughly, removing any debris, old caulking, or loose materials. This will help you achieve a seamless and secure installation.
- If necessary, apply a water-resistant barrier or flashing tape around the opening to prevent moisture intrusion.
Taking the time to measure accurately and prepare the opening properly will ensure a seamless fit and long-lasting performance of your new French windows.
Step 2: Removing the Existing Window
If you’re replacing an existing window, you’ll need to carefully remove it before installing the new French window unit. Follow these steps:
- Disconnect and remove any window treatments, such as curtains, blinds, or shutters, from the existing window.
- Using a pry bar, carefully remove the interior trim or casing around the window. Be gentle to avoid damaging the surrounding walls.
- If the existing window is nailed or screwed into place, locate and remove the fasteners using the appropriate tools.
- With the help of an assistant, carefully lift the window out of the opening, taking care not to damage the surrounding frame or walls.
- Inspect the opening for any rot, water damage, or structural issues. Address any necessary repairs before proceeding with the installation of the new French window.
- Thoroughly clean the opening, removing any debris, old caulking, or loose materials to ensure a smooth and secure installation surface.
Remember to exercise caution during the removal process and wear appropriate safety gear, such as gloves and eye protection, to avoid any injuries.
Step 3: Installing the Frame and Sash
With the opening prepared and the existing window removed, it’s time to install the new French window unit. Follow these steps carefully:
- Carefully lift the new French window unit into the opening, ensuring it is level and plumb. Have an assistant help you support the weight of the unit during this process.
- Use shims to secure the window frame in place. Start by placing shims at the bottom corners, then work your way up the sides, ensuring the frame is level and square.
- Once the frame is properly shimmed, secure it in place using the appropriate fasteners (nails or screws) recommended by the manufacturer. Be careful not to over-tighten the fasteners, as this can cause the frame to warp or distort.
- If the French window unit comes with separate sashes (movable glass panels), carefully install them according to the manufacturer’s instructions. Ensure they operate smoothly and are properly aligned within the frame.
- Apply a continuous bead of caulk around the interior and exterior perimeters of the window frame to seal any gaps and prevent air and moisture infiltration.
- If necessary, install any additional hardware or components, such as handles, locks, or weather stripping, as specified by the manufacturer.
Throughout the installation process, double-check for proper alignment, level, and operation of the French window unit. Take your time and follow the manufacturer’s instructions carefully to ensure a successful and long-lasting installation.
Step 4: Securing the Window and Checking for Proper Fit
Once the French window unit is installed, it’s crucial to ensure it is securely fastened and operating correctly. Follow these steps:
- Check the entire perimeter of the window frame for any gaps or spaces that need additional shimming or caulking. Fill any gaps with appropriate insulation material to prevent air leaks and improve energy efficiency.
- Inspect the operation of the sashes (movable glass panels) by opening and closing them several times. Ensure they move smoothly and latch securely in the closed position.
- Test the locking mechanisms and any additional hardware, such as handles or cranks, to ensure they function properly and engage securely.
- From both the interior and exterior, carefully inspect the window for any signs of air or water leaks. If any leaks are detected, reseal the affected areas with caulk or flashing tape as needed.
- If the installation requires trim or casing around the window, carefully measure and install the trim pieces, ensuring a tight and seamless fit.
- Once all components are installed and secured, perform a final check to ensure the window is level, plumb, and operating smoothly.
Taking the time to check and secure the French window installation thoroughly will ensure a long-lasting, energy-efficient, and properly functioning addition to your home.
Step 5: Finishing Touches and Maintenance Tips
Congratulations on installing your new French windows! Here are some final steps and maintenance tips to keep them looking great and working well:
- Caulking and Sealing: Apply a high-quality exterior caulk around the window frame to seal any gaps. This prevents air and water from getting in, improving energy efficiency and protecting your investment.
- Window Treatments: Add curtains, blinds, or shutters to enhance the look of your French windows and provide privacy and light control.
- Cleaning and Maintenance: Clean the glass regularly with a gentle glass cleaner and a soft cloth. Avoid using abrasive cleaners or materials that could scratch the glass or frames.
- Lubrication: Lubricate moving parts like hinges and locks periodically to ensure smooth operation and prevent wear and tear.
- Weatherstripping Inspection: Check the weatherstripping around the windows for any signs of wear or damage. Replace it as needed to maintain a good seal and keep your home energy-efficient.
- Professional Inspection: Schedule an annual professional inspection to catch any potential issues early and keep your French windows in top condition.
By following these tips, you’ll keep your French windows looking beautiful and working efficiently for years to come. Enjoy your bright, stylish new space!
Common Mistakes to Avoid During Installation
While installing French windows may seem straightforward, there are a few common mistakes that can cause problems down the road. Avoid these pitfalls to ensure a successful and long-lasting result:
Improper Measurements
Not taking accurate measurements of the opening or ignoring any irregularities can lead to a poor fit, air leaks, and potential water intrusion. Always double-check your measurements and follow the manufacturer’s guidelines to get them right.
Inadequate Flashing and Sealing
If you don’t properly flash and seal the window opening, moisture can get in, causing water damage, mold growth, and structural issues over time. Make sure to use proper flashing and sealing techniques to keep things dry and secure.
Incorrect Shimming
Using the wrong shim materials or shimming incorrectly can misalign the window frame, leading to operational problems and potential air and water leaks. Stick to the recommended shim materials and follow proper shimming techniques.
Over-tightening Fasteners
Tightening screws or nails too much can warp or distort the window frame, affecting its structural integrity and smooth operation. Follow the manufacturer’s guidelines for fastening to avoid this issue.
Neglecting Insulation
If you don’t properly insulate around the window frame, you’ll end up with energy loss and drafts, reducing your home’s overall energy efficiency. Use the right insulation materials and ensure proper sealing.
Improper Caulking
Using the wrong type of caulk or applying it incorrectly can lead to premature failure and potential air and water leaks. Always use high-quality caulk designed for window installations and follow the manufacturer’s application instructions.
By being mindful of these common mistakes and following best practices, you can ensure a successful French window installation that not only looks great but also provides long-lasting functionality and energy efficiency.
Frequently Asked Questions
How do you secure a French window?
Securing a French window involves using multi-point locking systems, which lock at several points along the frame, making it more difficult for intruders to force open. Additionally, you can install reinforced glass, window bars, or security film for added protection. For extra security, consider adding window sensors connected to your home security system.
Do French windows open inwards or outwards?
French windows can be designed to open either inwards or outwards, depending on your preference and the layout of your home. Inward-opening windows are more common in areas with limited outdoor space, while outward-opening windows are often chosen for better ventilation and to save indoor space.
How are French windows installed?
Installing French windows involves several steps: measuring the opening, preparing the frame, placing the window, securing it with screws, shimming to ensure its level, and finally sealing and insulating around the frame. It’s a task that requires precision, so if you’re not confident in your DIY skills, it’s wise to hire a professional.
What is the difference between a French window and a regular window?
A French window typically consists of two hinged panels that open outwards or inwards, often with large panes of glass extending the full length of the window. This design allows for more light and ventilation compared to regular windows, which may have fixed panes or open only partially. French windows also add a classic, elegant look to your home.
What is the purpose of French windows?
French windows enhance the aesthetic appeal of your home while providing practical benefits. They allow maximum natural light and ventilation, creating a brighter, more airy living space. Additionally, their wide-opening design offers a seamless connection between indoor and outdoor areas, making them perfect for patios, gardens, and balconies.
Conclusion
Installing a French window can truly transform your home, adding elegance, charm, and a seamless indoor-outdoor flow. Whether you’re looking to flood your space with natural light or create an inviting transition to your patio or garden, French windows are the perfect solution.
However, if the thought of tackling this project on your own feels overwhelming, don’t worry! At North Texas Home Exteriors, we specialize in professional installation services that ensure your French windows are perfectly fitted and secure. Our team of experts brings precision and expertise to every job, so you can sit back and enjoy the stunning results without the hassle.
Ready to elevate your home’s aesthetic and functionality? Contact North Texas Home Exteriors today, and let us help you bring your vision to life. With our top-notch service and commitment to quality, you’ll be enjoying the timeless beauty and enhanced living experience of French windows in no time. Reach out now for a consultation and take the first step towards transforming your home!
End Note
Our team North Texas Home Exteriors is passionate about helping you enhance your home with style and functionality. Whether you’re considering window replacement, new siding, updating your exterior, or tackling another home improvement project, our team is here to assist you every step of the way.
Curious about our other services? Check out our Service offerings and see how we can transform your home. We proudly serve a wide area, and you can find more details on the Services Area page. Want to learn more about us? Get to know us better on our About Us page or Contact Us directly.
Stay updated by following our Facebook page. For more tips and insights, don’t forget to visit our Blog.
Ready to take the next step? Reach out to North Texas Home Exteriors today, and let us help you make your home improvement dreams a reality!